JMeter is an open source load testing tool, with many capabilities. One of the many interesting things which can be done is to integrate a webdriver test into a JMeter test suite.
Before start make sure that Java and JMeter properly installed, and the webdriver libraries are downloaded. You can download them from the following links:
- Java: http://www.java.com/getjava/
- JMeter: http://jmeter.apache.org/
- Webdriver: http://docs.seleniumhq.org/download/
The following step is to create a new project in Eclipse with a webdriver test. To keep it simple the test just hits the google.com page, and will check its title.
To create a project:
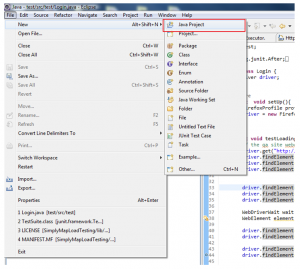
- Click File -> New- > Java Project
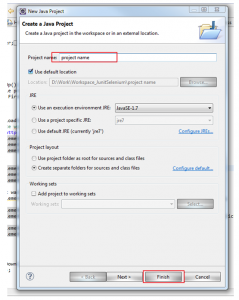
- Enter project name -> click Finish
Add the webdriver and JUnit 4 libraries to the build path:
To do this right click on the project -> Build Path -> Add libraries

Choose JUnit and select change the version to Junit4 -> click Finish

Copy the downloaded webdriver libraries into the project’s lib folder and add them too to the build path.
After the addition the project structure should look like this:
Now the project setup is done and we can start the coding:
package jmetertest;

import org.junit.After;
import org.junit.Assert;
import org.junit.Before;
import org.junit.Test;
import org.openqa.selenium.WebDriver;
import org.openqa.selenium.firefox.FirefoxDriver;
import org.openqa.selenium.firefox.FirefoxProfile;

public class Login {
    WebDriver driver;

    @Before
	public  void setUp(){
		FirefoxProfile profile = new FirefoxProfile();
		driver = new FirefoxDriver(profile);
	}

    @Test
	public void testLoadingFirstPage() throws Exception{
		driver.get("http://www.google.com/");
		Assert.assertEquals("Google",driver.getTitle());
	}

    @After
	public void tearDown() {
		driver.quit();

	}
}
In the code before the test we simply initialize the webdriver with a basic firefoxDriver and profile, the test loads the google.com page and then checks its title and close the driver when it’s done.
Be sure to mark the test with the @Test annotation, because JMeter will only loads tests which are marked.
So far, so good. The next step is to export the project as a jar file into the jmeter’s test folder
Click on File -> Export the export dialog will appear.
Choose Java- >Jar file -> click next
On the export settings page check the project to export and set the export destination to where JMeter is installed, like on the screenshot: “C:\Users\WardenX\Downloads\apache-jmeter-2.8\lib\junit\test.jar”
You could rename text.jar to yourTestProject.jar to give it some meaning. It is a good practice to give meaningful names to classes, and exported files, it makes things easier to track.
The test.jar should be in place now. And the last thing need to be done before running the test is to copy the webdriver libraries to the Jmeter’s lib folder. (Which in this case is: C:\Users\WardenX\Downloads\apache-jmeter-2.8\lib)
Just in case made a screenshot of the lib folder too:
Now start up JMeter and create a basic test plan by adding a “thread group” and a “Once Only” logic controller to it. After this the test Plan should look like the on the screenshot below.
To be able to run JUnit test we should add a “JUnit Request” to the Once only logic controller.
If the earlier steps were correctly done the export class should appear on the JUnit Request configuration page, and you can choose the Test Method – the one with the @Test annotation – from the list.
Now if you click on the Green play button the test will start to execute.


